
- DaVinci Resolve Tutorial
How to Use DaVinci Resolve for Automatic Video Color Correction

Feb 19,2020• Proven solutions
There is wide range of manual controls on DVR platform that can help users to work upon every single element of a digital image. The colourist efficiency gets multiplied with advanced and interactive DVR platform. Also, it contains so many professional editor programs that can assists users with automated finishing, grading and editing tasks. It becomes much easier to complete the editing task with resolve environment.
The article below will help you to gain information about three useful methods of automated color grading on DVR and FilmoraPro
An Easier Way for Color Grading & Color Correction - FilmoraPro
If you are looking for an easy way to correct your video color, you should try FilmoraPro to correct color automatically. Auto correction will save you a lot of time and energy. With high-quality presets, you will get cinematic effects. If you want to correct color manually, you can adjust the white balance, HSL, vigmette, 3D LUT and more. Download it now to have a try (Free)!
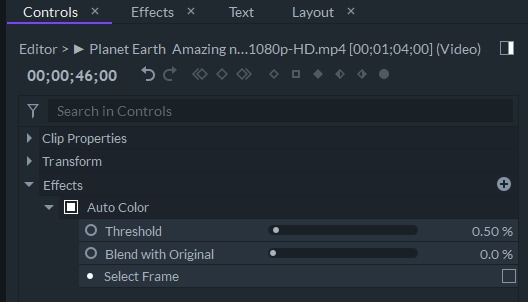
Steps to make color correction automatically
Step 1: Open up FilmoraPro and import video onto timeline.
Step 2: Go to effects tab to search "auto color". Then drag Auto Color onto video clip.
Step 3: The color correction will be taken effect immediately. Then you can go to Controls tab to adjust threshold and blend to adjust this effects.

Three Methods for Automatic colour Grading in DaVinci Resolve
Method 1: Auto Color:
This Auto Colour command is used to gain quick access to black and white balancing on frames. The darkest levels are utilized to adjust the RGB colour balance for blacks whereas brightest levels are accessed for highlighted RGB colour balancing. You can also use the master gain and master lift options to adjust image contrast with boundaries between 0 tp 100.
The best thing to know about Auto Grade is that it provides immediate results for video clip editing without using sampling process or even without setting specific analysis patterns. But if you don’t know how to use this command then it will result in hit or miss effect.
If you want to make automatic correction:
- Simply open your colour wheel palette into any desired mode and then hit A button available on lower left hand portion of screen.
- Select color and then go to Auto Color option.
Note that, auto color option works only when users have activated their Qualifier tool in viewer window.
Tips: Prefer to use Primaries Bar function for viewing output or it is also good to access it on video scope. But DVR is not able to analyse subjects for colour correction effects hence this method may fail in most of situations.
Method 2: Color Match
Step 1: In case if professionals want to shoot colour test chart for every lighting setup in the grading project then DVR can be used to sample grid on clip charts and it will perform mathematical analysis over sampled colours for automated correction. Color Palette controls can assist users to specify target gamma, source gamma and target color space for accurate results.
- First of all you need to grab shot of color chart table that reflects all gradients or shadows accurately. The results for this particular analysis will completely depend upon field chart shooting.
- All charts must be designed in such a manner that each patch posses same colour and intensity level. Mismanagement of shadow lighting colors will cause inaccurate matches.

Step 2: Now you need to select the clip with your desired colour chart so that it can be sampled accordingly.
Step 3: Move to the color Match palette and then select right color check from right most corner.
- You can access source gamma pop-up menu for corresponding media file.
- Select target gamma with desired color space to achieve your desired format.
Step 4: Things to know about Source gamma, target gamma, target colour space and color temperature:
- Source Gamma: Choose right value for source gamma to have great results; it defines the source gamma value for your recorded media.
- Target Gamma: It defines the final gamma value that you want to implement for your corrected clip.
- Target Color Space: It is the colour space that you will output after finishing your project.
- Color Temp: It is an adjustable color temperature control that helps users to adjust all color balances for targets so that finer results can be generated.
Step 5: Select your color chart tool from bottom left corner of viewer window and access its color pinning controls to prepare your sampling color boxes with chart color patches.
Step 6: If you line up your captured color chart in DaVinci for original footage then resolve can be used for automatic fixing of color inconsistencies.
The color window will help users to gain complete information about the amount of colours that must be tweaked for perfect inbuilt settings match.
If you want to apply color match for all captured shots over same location then use same lighting feature with node that you want to process. The bottom right corner will show you node information that is accessed for color match palette processing.
Check the video below for more detailed information about the Color Match Palette.
Method 3: Shot Match
Above two methods are useful if you want to generate natural and clean starting points within very less time. But the shot match feature can assist users for working on a series of clips with automated controls. When you want to access best results in a highly occupied work schedule then a Shot Match method can provide you best results. With this feature, different clips on timeline can be placed close to each other and quick color balance can be achieved with color correction tools.
The procedure to complete this method is quite simple but you need to be careful during whole process.
Step 1: First of all you need to select the starting clip so that everything can be matched ahead.
Step 2: Hold CTRL key on the keyboard and then select other clips with which you want to perform the matching process.
Step 3: Now right click on the base clip for your grading process and from drop down menu select Shot Match option.
Bring up your video to a professional level with straightforward tools.
Try It Free Try It Free
Liza Brown
chief Editor
0 Comment(s)